Draenei Guide
 |
|
|
Draenei Leveling Guide
Level 1-12
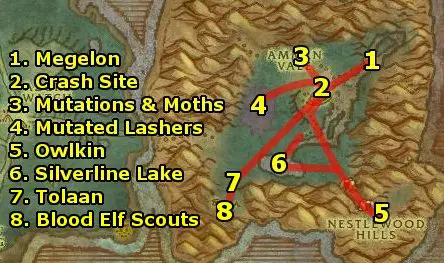
- Get You Survived! from Megelon in front
of you.
- Head down the path southwest to the Crash Site. Turn
in You Survived! and get Replenishing the Healing
Crystals and Volatile Mutations.
- Head north and kill 8 Volatile Mutation and Vale
Moths for 8 Vial of Moth Blood.
- Then, return to the Crash Site and turn in Replenishing
the Healing Crystals and Volatile Mutations.
Get the follow-ups What Must Be Done..., Botanical
Legwork, Urgent Delivery!, and your Class Quest.
Go inside the crash site and turn in Urgent Delivery!
and get the follow-up Rescue the Survivors!
- Head west and kill Mutated Root Lashers for 10
Lasher Samples, use your Gift of the Naaru ability
on a Draenei Survivor in the area, and gather 3
Corrupted Flowers.
- Return to the Crash Site and turn in What
Must Be Done..., Botanical Legwork, and Rescue
the Survivors! Get the follow-up Healing the Lake.
Go around to the south area of the Crash Site and
get Inoculation and Spare Parts as well.
- Head southeast to the Owlkin area. Head southeast
through the tunnel. Use your Inoculating Crystal on
the 6 Neutral Nestlewood Owlkin and pick
up 4 Emitter Spare Parts.
- Head west to Silverline Lake to the Irradiated
Power Crystal and click it to Disperse the Neutralizing
Agent.
- Return to the Crash Site and turn in Healing
the Lake, Inoculation, and Spare Parts. Get
the follow-up The Missing Scout. Train your
skills.
- Head southwest to Tolaan and turn in The Missing
Scout. Get the follow-up The Blood Elves.
- Head southwest and kill 10 Blood Elf Scouts.
- Return to Tolaan and turn in The Blood Elves
and get the follow-up Blood Elf Spy.
- Return southwest and kill Surveyor Candress at
the top of the blood elf camp. Start the quest Blood
Elf Plans from her quest item drop as well.
- Return to the Crash Site and turn in Blood
Elf Spy and Blood Elf Plans. Get the follow-up
The Emitter and turn it in immediately and get
the follow-up Travel to Azure Watch.
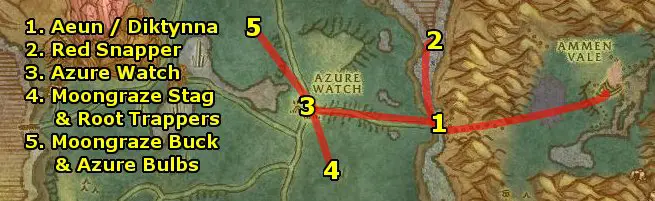
- Head west out of the area to Aeun and get Word
from Azure Watch. Head further west and get Red Snapper
- Very Tasty! from Diktynna.
- Head north and use your Draenei Fishing Net while
you're over Schools of Red Snapper to catch 10
Red Snapper.
Then, return to Diktynna and turn in Red Snapper
- Very Tasty! Get the follow-up Find Acteon!
- Head west to Azure Watch and turn in:
- Travel to Azure Watch
- Word from Azure Watch
- Find Acteon!
Get The Great Moongraze Hunt and Medicinal
Purpose.
- Head south and kill Moongraze Stag for 6 Moongraze
Stag Tenderloin and Root Trappers for 8 Root
Trapper Vines.
- Then, return to Azure Watch and turn in The
Great Moongraze Hunt and get the next step in the
chain. Turn in Medicinal Purpose and get the
follow-up An Alternative Alternative.
- Head northwest and kill Moongraze Buck for 6
Moongraze Buck Hide and gather 5 Azure Snapdragon
Bulbs. Also, there are many Infected Nightstalker
Runts in the area. Kill one to get a Faintly Glowing
Crystal, which will start the quest Strange Findings.
- Then, return to Azure Watch and turn in The
Great Moongraze Hunt, An Alternative Alternative,
and Strange Findings. Get the follow-ups The
Prophecy of Velen and Nightstalker Clean Up,
Isle 2.
- Then, head northwest again and kill 8 Infected
Nightstalker Runts.
- Return to Azure Watch and turn in Nightstalker
Clean Up, Isle 2.
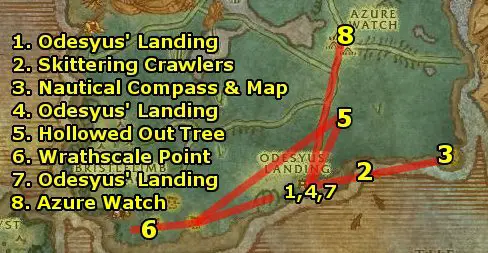
- Head south to Odesyus' Landing. Turn in The
Prophecy of Velen and get the follow-up A Small Start.
Also, get Cookie's Jumbo Gumbo.
- Head east along the shore and kill Skittering Crawlers
until you get 6 Skittering Crawler Meat.
- Reach Geezle's Camp. Loot the Nautical Compass
and Nautical Map. The compass is in the southeastern
part of camp, the map is in the northwestern part.
- Return to Odesyus' Landing and turn in A Small
Start and Cookie's Jumbo Gumbo. Get the follow-up
quests:
- Precious and Fragile Things Need Special Handling
- Reclaiming the Ruins
- I've Got a Plant
- Head northeast and gather 5 Pile of Leaves and
a Hollowed Out Tree.
- Head southwest to Wrathscale Point.
- Collect 8 Ancient Relics
- Kill 5 Wrathscale Myrmidon, 5 Wrathscale Naga,
and 5 Wrathscale Siren
- Start the quest Rune Covered Tablet from the
random quest drop from the Naga
- Then, return to Odesyus' Landing and turn in:
- Precious and Fragile Things Need Special Handling
- Reclaiming the Ruins
- Rune Covered Tablet
- I've Got a Plant and get the follow-up Tree's
Company
Also, get the follow-up Warlord Sriss'tiz after
the brief dialogue scene.
- Return north to Azure Watch.
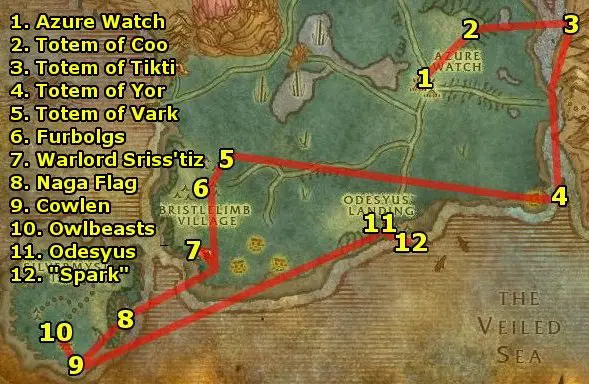
- At Azure Watch, Train your skills. Get Learning
the Language and The Missing Fisherman.
Read the Stillpine Furbolg Language Primer then complete
the quest at the Totem of Akida. Get the follow-up
Totem of Coo.
- Follow the Stillpine Ancestor Akida northeast
to the Totem of Coo. Complete the quest and get the
follow-up Totem of Tikti.
- Follow the Stillpine Ancestor Coo east off the
cliff one you gain the Ghost Walk buff to the Totem
of Tikti. Complete the quest and get the follow-up Totem
of Yor.
- Swim south to the Totem of Yor. Complete the quest
and get the follow-up Totem of Vark.
- Follow Stillpine Ancestor Yor west until you turn
into a spirit, then go ahead to the Totem of Vark.
Complete the quest and get the follow-up The Prophecy
of Akida.
- Kill the Bristlelimb Furbolgs for the Bristlelimb
Keys and Free 8 Stillpine Captives.
- Head southwest into the cave and kill Warlord Sriss'tiz
at the end of the cave (southwesternmost area).
- Swim southwest to the Naga Flag and use the Tree
Disguise Kit and listen to the conversation.
- Head southwest to Cowlen and turn in The Missing
Fisherman. Get the follow-up All That Remains.
- Head northwest and kill Owlbeasts until you get
the Remains of Cowlen's Family.
- Then, return to Cowlen and turn in All That
Remains.
- Head northeast to Odesyus' Landing and turn in
Tree's Company and Warlord Sriss'tiz. Get
the follow-up Show Gnomercy.
- Head south to Engineer "Spark" Overgrind
and talk to him, then kill him.
Then, return to Odesyus' Landing and turn in Show
Gnomercy. Get the follow-up Deliver Them From Evil...
- Head north to Azure Watch and turn in Deliver
Them From Evil... and The Prophecy of Akida.
Get the follow-up Stillpine Hold and the new quest
Coming of Age, and your level 10 class quest if you
have one.
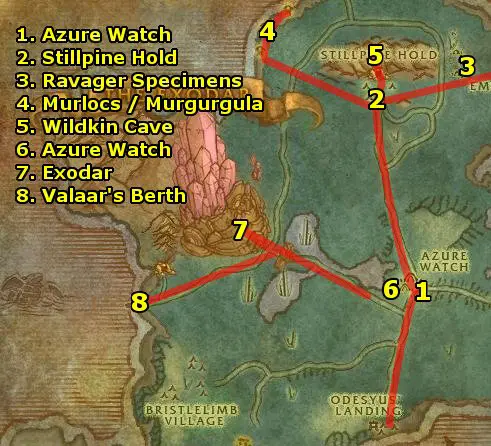
- Head north to Stillpine Hold. Turn in Stillpine
Hold and get Beasts of the Apocalypse! and Murlocs...Why
Here? Why Now?
- Head east and kill Ravager Specimens for 8 Ravager
Hide.
- Then, return to Stillpine Hold and turn in Beasts
of the Apocalypse!
- Head west and kill the murlocs for 5 Stillpine Grain.
Also, search out and kill Murgurgula to get Gurf's
Dignity, which starts the quest Gurf's Dignity.
- Then, return to Stillpine Hold and turn in Murlocs...Why
Here? Why Now? and Gurf's Dignity.
Get the new quests Search Stillpine Hold and Chieftain
Oomooroo.
- Head into the cave and turn right at the first intersection,
upwards, then cross the bridge and kill Chieftain Oomooroo.
Finish killing 9 Crazed Wildkin then get out of the
cave.
- Turn in Chieftain Oomooroo. Get the follow-up
The Kurken is Lurkin'.
- Return into the hold and take the direct path on the
lower level northwards. At the end, kill The Kurken
and loot The Kurken's Hide. Rest up and go
up to the Blood Crystal to complete Search
Stillpine Hold. Get the follow-up Blood Crystals
and prepare for an ambush of two wildkin.
- Take the direct path out. Turn in Blood Crystals
and The Kurken is Lurkin'. Get the follow-ups
Warn Your People and The Kurken's Hide. Turn
in The Kurken's Hide in the village.
- Return to Azure Watch and turn in Warn Your
People.
- Head northwest to Exodar. Get the Flight
Path. Turn in Coming of Age at Torallius the
Pack Handler. Don't get the follow-up.
- Also, since you won't be coming back again for a
while, go to the Weapon Master in town (Talk
to a guard and ask for the location of Weapon Masters
for a pinpoint location) and train proficiency in
any weapon skills you can learn.
- Head southwest to Valaar's Berth.
We're going to sail to Auberdine, where you should
get the flight path - then, sail to Stormwind
Harbor and get Stormwind's Flight Path as well.
Bloodmyst Isle is not terrible for leveling, but it turns
out that there aren't enough quests there to just be able
to keep questing - traveling to Azeroth allows you to bounce
between Westfall and Dun Morogh easily.
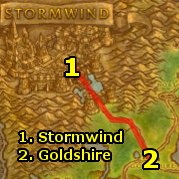
- At Stormwind, train your skills. Make sure
to get the Stormwind Flight Path. Some classes will
have a Level 10 Class Quest as well, pick it up.
Also, get Humble Beginnings from Baros Alexston
in the northeast section of Cathedral Square.
- Head southeast to Goldshire.
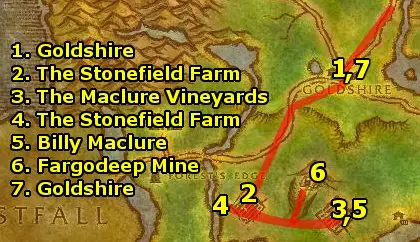
- Arrive at Goldshire and Set
your Hearthstone to Goldshire. Get all the quests
in the area:
- Gold Dust Exchange
- Kobold Candles
- The Fargodeep Mine
- A Fishy Peril - then, turn it in and get the
follow-up Further Concerns
- Elmore's Task
- Report to Gryan Stoutmantle
- Head southwest to The Stonefield Farm. Get the
quests Lost Necklace and Princess Must Die!
- Head east to The Maclure Vineyards and talk to
Maybell to get Young Lovers and talk to Billy
Maclure and turn in Lost Necklace and get the
follow-up Pie for Billy. Kill Stonetusk Boars
at the farm for 4 Chunk of Bear Meat.
- Head west to The Stonefield Farm and turn in Pie
for Billy. Get the follow-up Back to Billy. Further
to the west, turn in Young Lovers to Tommy Joe
Stonefield and get the follow-up Speak with Gramma.
Turn in the quest at Gramma Stonefield and get the
follow-up Note to William.
- Return to Billy Maclure and turn in Back to
Billy and get the follow-up Goldtooth.
- Head south inito the Fargodeep Mine. Kill your
way through to the northeast section and kill Goldtooth
for Bernice's Necklace. You don't have to complete
Gold Dust Exchange or Kobold Candles yet as there will be
another mine to visit soon.
- Return to Goldshire.
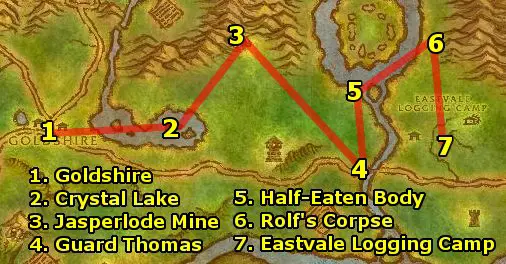
- At Goldshire, turn in The Fargodeep Mine.
Get the follow-up The Jasperlode Mine. Turn in Note
to William and get the follow-up Collecting Kelp.
- Head northeast to Crystal Lake and kill Murlocs
for 4 Crystal Kelp Fronds.
- Head northeast to the Jasperlode Mine and fight
your way through until you get:
- Credit for Exploring the Mine
- 10 Gold Dust
- 8 Large Candle
- Head southeast to Guard Thomas. Turn in Further
Concerns and get the follow-ups Find the Lost Guards
and Protect the Frontier.
- Head northwest to A Half-Eaten Body and complete
Find the Lost Guards and get the follow-up Discover
Rolf's Fate.
- Head northeast to Rolf's Corpse and complete Discover
Rolf's Fate. Get the follow-up Report to Thomas.
- Head southeast into the Eastvale Logging Camp.
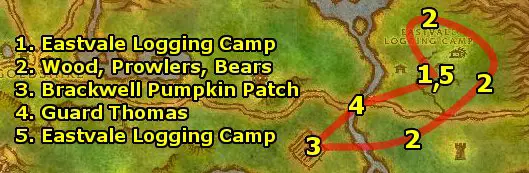
- At the Eastvale Logging Camp, get the quests A
Bundle of Trouble and Red Linen Goods.
- Head around the camp from the northwest to the southeast
and gather 8 Bundles of Wood, and kill 8 Prowlers
and 5 Young Forest Bears.
- Head southwest to the Brackwell Pumpkin Patch.
Kill Defias Bandits for 6 Red Linen Bandana and kill
Princess for her Brass Collar. If you get
lucky, you may get the random drop Westfall Deed which
starts the quest Furlbrow's Deed.
- Go to Guard Thomas and turn in Protecting the
Frontier and Report to Thomas. Get the follow-up
Deliver Thomas' Report.
- Go to the Eastvale Logging Camp and turn in A
Bundle of Trouble and Red Linen Goods.
- Once done, Hearth to Goldshire.
- At Goldshire, turn in your quests:
- Collecting Kelp and get the follow-up The
Escape
- Gold Dust Exchange
- Kobold Candles and get the follow-up Shipment
to Stormwiind
- Deliver Thomas' Report - don't get the follow-up
Cloth and Leather Armor.
- The Jasperlode Mine and get the follow-up
Westbrook Garrison Needs Help!
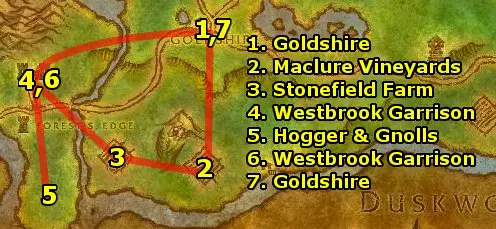
- Head south to the Maclure Vineyards. Turn in The
Escape.
- Head west to the Stonefield Farm. Turn in Goldtooth
and Princess Must Die!
- Head northwest to Westbrook Garrison. Turn in Westbrook
Garrison Needs Help! and get the quests Riverpaw
Gnoll Bounty and Wanted: "Hogger" (Group).
- Head south to the gnoll camps and kill the Riverpaw
Gnolls for 8 Painted Gnoll Armband. If you get
lucky, you may get the random drop Gold Pickup Schedule
as a random quest drop from the gnolls, which starts
the quest The Collector.
Also, try to find someone to group with to kill the infamous
Hogger for his Huge Gnoll Claw. He's soloable,
but is a difficult fight - use any items you've gotten so
far to help, especially a healing potion.
- Head north to Westbrook Garrison and turn in Riverpaw
Gnoll Bounty.
- Head northeast to Goldshire. Turn in Wanted:
"Hogger" - and, if you got lucky with the
random drop, turn in The Collector. Don't get the
follow-up Manhunt because it is far out of
the way. Train your skills.
That concludes Elwynn Forest. Head southwest into
Westfall.
|