Horde Howling Fjord Guide Part 5
Level 72
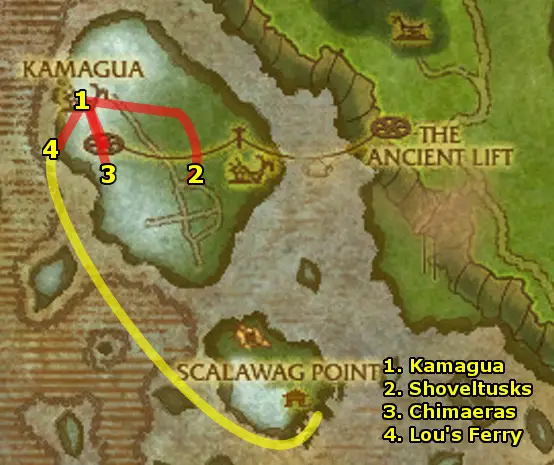
- Ride north to Kamagua and Get the new flight
path. Turn in Elder Atuik and Kamagua and get
the quests:
- Grezzix Spindlesnap
- Feeding the Survivors
- Head southeast and kill Shoveltusks for 6 Island
Shoveltusk Meat.
- Then, return to Kamagua and turn in Feeding
the Survivors and get the follow-up Arming Kamagua.
- Head south and kill Frostwing Chimaeras for 3
Chimaera Horns.
- Then, return to Kamagua and turn in Arming
Kamagua and get the follow-up Avenge Iskaal.
- Head southwest and turn in Grezzix Spindlesnap and
get the follow-up Street "Cred". Talk to
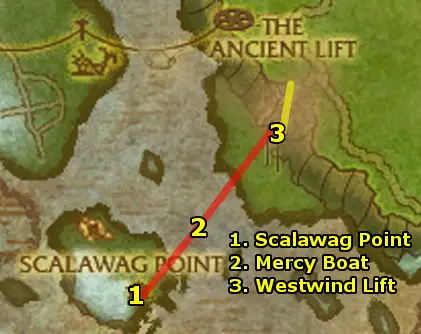
Lou the Cabin Boy and have him sail you to Scalawag
Isle.
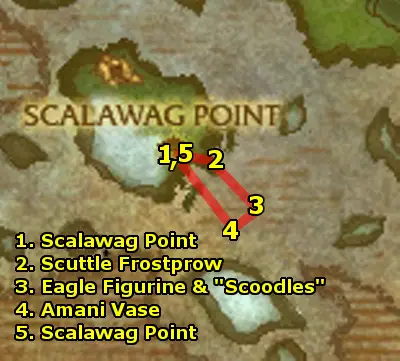
- At Scalawag Point, turn in Street "Cred"
to "Silvermoon" Harry inside the tent.
Get the follow-up "Scoodles".
Also, get the quest Forgotten Treasure from Handsome
Terry.
- Head southeast onto the pirate ship and get the quest
Swabbin' Soap from Scuttle Frostprow.
- Use your Fish Bladder so you can breathe underwater.
Dive and swim southeast to the wrecked ships. Around this
area is "Scoodles". Kill it for the Sin'dorei
Scrying Crystal.
Dive down to the ocean floor to the first ship and loot
the Eagle Figurine.
- Swim southwest to the other wrecked ship and loot the
Amani Vase.
- Return to Scalawag Point.
- At Scalawag Point, turn in:
- Forgotten Treasure and get the follow-up The
Fragrance of Money
- "Scoodles" and get the follow-ups:
- The Ancient Armor of the Kvaldir
- The Frozen Heart of Isuldof
- The Lost Shield of the Aesirites
- The Staff of Storm's Fury
Get the new quest Gambling Debt as well from Taruk.
Time to collect some debts:
- Go to "Silvermoon" Harry and talk
to him, then defeat him for his debt.
- Then, return to Taruk and turn in Gambling
Debt get the follow-up Jack Likes His Drink.
- Go to the tavern. Talk to Olga, the Scalawag Wench
and give her 1 gold to get Jack Adams drunk.
Get the debt from the passed out Jack Adams.
- Then, return to Taruk and turn in Jack
Likes His Drink and get the follow-up Dead
Man's Debt.
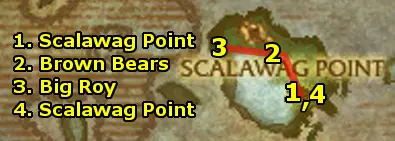
- Head north and kill Rabid Brown Bears for 4
Bear Musk.
- Head west to Big Roy at the northwest shore of
the island. Loot Big Roy's Blubber.
- Return to Scalawag Point.
- At Scalawag Point, turn in:
- The Fragrance of Money and get the follow-up
A Traitor Among Us. Turn that quest in and get
the follow-up Zeh'gehn Sez. Next, turn that in
and get the follow-up A Carver and a Croaker.
- In the nearby area, look for a Scalawag Frog.
Right click it to pick it up.
- Also, go to "Silvermoon" Harry and
buy a Shiny Knife.
- Then, turn in A Carver and a Croaker. Get
the follow-up "Crowleg" Dan.
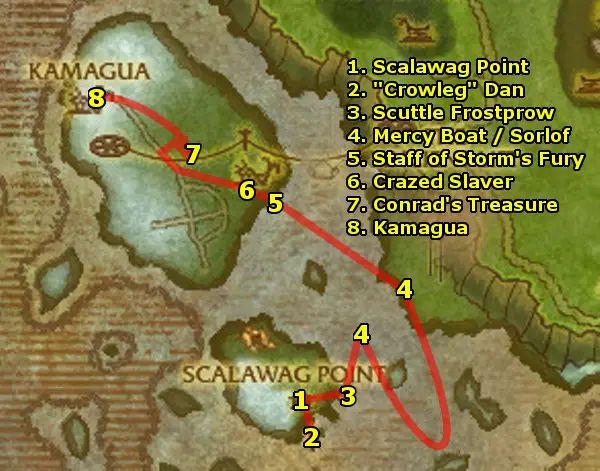
- Head south to the ship. Talk to "Crowleg"
Dan, then kill him.
- Then, return to Handsome Terry and turn in
"Crowleg" Dan and get the follow-up
Meet Number Two. Go into the tavern's second
floor and turn in that quest and get the follow-up The
Jig is Up.
- Get on Scuttle Frostprow's ship and turn in Swabbin'
Soap.
- Swim northeast to an island with the NPC Juniper on
it. Wait for the boat to come.
- On the boat, turn in The Lost Shield of the Aesirites
and get the follow-up Mutiny on the Mercy.
- Go down to the bottom of the ship and kill the pirates
for 5 Barrel of Blasting Powder.
- Then, head back to the top of the boat and turn in Mutiny
on the Mercy and get the follow-up Sorlof's Booty.
- Head to the back of the ship (still on the top floor)
to The Big Gun. When the ship starts attacking
Sorlof, keep using The Big Gun to kill Sorlof.
Once he's dead, jump off and loot Sorlof's Booty.
- Swim northwest to the ship and wait for Abdul the Insane
to path away from the entrance to the ship's hold. Sneak
past him into the hold and loot The Staff of Storm's
Fury.
- Head northwest and use your Horn of Kamagua to
summon a Tuskarr to help. Kill 8 Crazed Northsea
Slaver.
- Head further northwest and find the bridge. Cross it and
loot the Dirt Mound. This spawns Black Conrad's
Ghost and two other ghosts. Kill them for Black Conrad's
Treasure.
- Ride northwest to Kamagua.

- At Kamagua, turn in Avenge Iskaal. Get the
new quest The Way to His Heart.
- Ride south to the southern coast of the island and head
west for the fish. Use Anuniaq's Net to collect about
10 Tasty Reef Fish.
- Head south and, from maximum range, use the fish on a
Reef Bull.
- Repeat "pulling" the Reef Bull north
until the Reef Bull reaches the Reef Cow.
- Ride southeast and into the cave. Despite the group quest
label, it can be solo'd.
- The first portion is easy - don't blow any cooldowns
on it. Bring "Mad" Jonah Sterling down
to near death and he will escape and jump through a
hole in the wall to Hozzer.
- Follow him down and use your cooldowns. Kite and
stun Hozzer as best you can, as he hits fairly
hard. Loot Jonah Sterling's Spyglass off of its
corpse.
- Behind Hozzer at the end of the cave, loot The
Frozen Heart of Isuldof.
- Return to Scalawag Point.
- At Scalawag Point, turn in The Jig is Up
and A Dead Man's Debt.
- Head south to the docks and talk to Alanya next
to the flying machine and take the flight.
- Go down to the ship's hold on the island and loot
The Ancient Armor of the Kvaldir.
- Use the flying machine to return to Scalawag Point.
- Swim northeast to the island again and wait for the boat
to arrive. Turn in Sorlof's Booty and get the follow-up
The Shield of the Aesirites.
- Swim northeast to the Westwind Lift and take the
lift up.
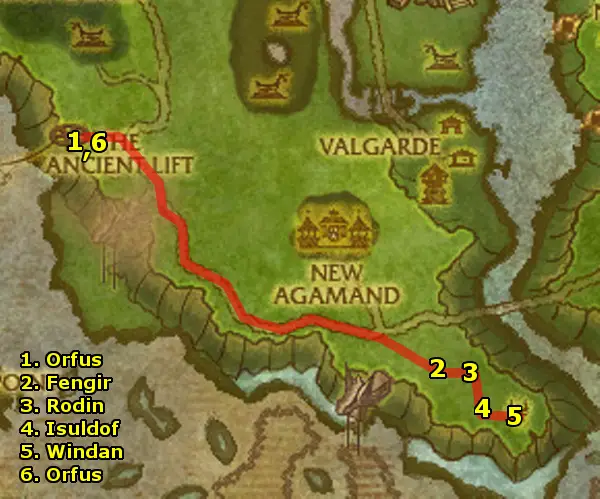
- Head northwest to Orfus of Kamagua and turn in
your quests:
- The Ancient Armor of the Kvaldir
- The Frozen Heart of Isuldof
- The Shield of the Aesirites
- The Staff of Storm's Fury
and get the follow-up A Return to Resting.
- Ride southeast to Shield Hill. We're going back
to the same locations as before when first getting the clues.
Go southeast and use the Bundle of Vrykul Artifacts at
Fengir.
- Head east and use the bundle at Rodin.
- Head south and use the bundle at Isuldof.
- Head east and use the bundle at Windan.
- Return to Orfus and turn in A Return to Resting
and get the follow-up Return to Atuik.
- Then, take the lift down to Kamagua. Turn in
Return to Atuik and The Way to His Heart.
To complete the Howling Fjord, Hearth to New Agamand.
Turn in Draconis Gastritis and Warning: Some Assembly
Required.
And...finally, turn in Give it a Name (if you've
managed to hold off on turning it until now!) You will
get the follow-up To Venomspite! and be flown off to
Venomspite, Dragonblight.
|